An NFS server instance, that exports the directory /exports/example to any instance running on Chameleon bare metal,
One or several NFS client instances, which configure /etc/fstab to mount this NFS share to /mnt (and can subsequently read from and write to it).
This template is reproduced further below, and includes inline comments starting with the # character. There are three main sections:
resources
parameters
outputs
The resources section is the most important part of the template: it defines which OpenStack Resources to create and configure. Inside this section you can see four resources defined:
nfs_server_floating_ip: creates a Floating IP on the ext-net public network. It is not attached to any instance yet.
nfs_server: creates the NFS server instance (an instance is defined with the type OS::Nova::Server in Heat). It is a bare metal instance (flavor:baremetal) using the CC-CentOS7 image and connected to the private network named sharednet1. We set the key pair to use the value of the parameter defined earlier, using the get_param function. Similarly, the reservation to use is passed to the scheduler. Finally, a user_data script is given to the instance, which configures it as an NFS server exporting /exports/example to Chameleon instances.
nfs_server_ip_association: associates the floating IP created earlier with the NFS server instance.
nfs_clients: defines a resource group containing instance configured to be NFS clients and mount the directory exported by the NFS server defined earlier. The IP of the NFS server is gathered using the get_attr function, and placed into user_data using the str_replace function.
Once a Resource has been specified, you may provide it as a value for another Resource’s property using the get_resource function.
The parameters section defines inputs to be used on Complex Appliance launch. Parameters all have the same data structure: each one has a name (key_name or reservation_id in this case), a data type (number or string), a comment field called description, optionally a defaultvalue, and a list of constraints (in this case only one per parameter). Constraints tell Heat to match a parameter to a specific type of OpenStack resource. Complex appliances on Chameleon require users to customize at least the key pair name and reservation ID, and will generally provide additional parameters to customize other properties of the cluster, such as its size, as in this example. The values of Parameters can be used in the resources section using the get_param function.
The outputs section defines what values are returned to the user. Outputs are declared similarly to Parameters: they each have a name, an optional description, and a value. They allow to return information from the stack to the user. You may use the get_attr function to retrieve a resource’s attribute for output.
Customizing an existing template is a good way to start developing your own. We will use a simpler template than the previous example to start with: it is the Hello World complex appliance.
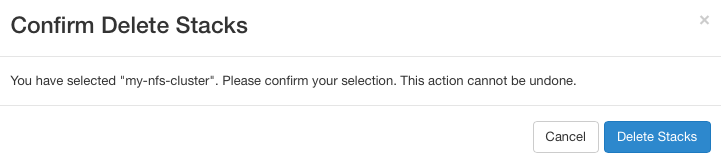
First, delete the stack you launched, because we will need all three nodes to be free. To do this, go back to the Project > Orchestration > Stacks page, select your stack, and then click on the Delete Stacks button. You will be asked to confirm, so click on the Delete Stacks button.
The template for the Hello World complex appliance is reproduced below. It is similar to the NFS share appliance, except that it deploys only a single client. You can see that it has four resources defined:
nfs_server_floating_ip
nfs_server
nfs_server_ip_association
nfs_client
The nfs_client instance mounts the NFS directory shared by the nfs_server instance, just like in our earlier example.
# This describes what is deployed by this template.
description: NFS server and client deployed with Heat on Chameleon

# This defines the minimum Heat version required by this template.
heat_template_version: 2015-10-15

# The resources section defines what OpenStack resources are to be deployed and
# how they should be configured.
resources:
  nfs_server_floating_ip:
    type: OS::Nova::FloatingIP
    properties:
      pool: ext-net

  nfs_server:
    type: OS::Nova::Server
    properties:
      flavor: baremetal
      image: CC-CentOS7
      key_name: { get_param: key_name }
      networks:
         - network: sharednet1
      scheduler_hints: { reservation: { get_param: reservation_id } }
      user_data: |
        #!/bin/bash
        yum install -y nfs-utils
        mkdir -p /exports/example
        chown -R cc:cc /exports
        echo '/exports/example 10.140.80.0/22(rw,async) 10.40.0.0/23(rw,async)' >> /etc/exports
        systemctl enable rpcbind && systemctl start rpcbind
        systemctl enable nfs-server && systemctl start nfs-server

  nfs_server_ip_association:
    type: OS::Neutron::FloatingIPAssociation
    properties:
      floatingip_id: {get_resource: nfs_server_floating_ip}
      port_id: {get_attr: [nfs_server, addresses, sharednet1, 0, port]}

  nfs_client:
    type: OS::Nova::Server
    properties:
      flavor: baremetal
      image: CC-CentOS7
      key_name: { get_param: key_name }
      networks:
         - network: sharednet1
      scheduler_hints: { reservation: { get_param: reservation_id } }
      user_data:
        str_replace:
          template: |
            #!/bin/bash
            yum install -y nfs-utils
            echo "$nfs_server_ip:/exports/example    /mnt/    nfs" > /etc/fstab
            mount -a
          params:
            $nfs_server_ip: { get_attr: [nfs_server, first_address] }

# The parameters section gathers configuration from the user.
parameters:
  key_name:
    type: string
    description: Name of a KeyPair to enable SSH access to the instance
    default: default
    constraints:
    - custom_constraint: nova.keypair
  reservation_id:
    type: string
    description: ID of the Blazar reservation to use for launching instances.
    constraints:
    - custom_constraint: blazar.reservation
Download this template to your local machine, and open it in your favorite text editor.
We will customize the template to add a second NFS client by creating a new resource called another_nfs_client. Add the following text to your template inside the resources section. Make sure to respect the level of indentation, which is important in YAML.
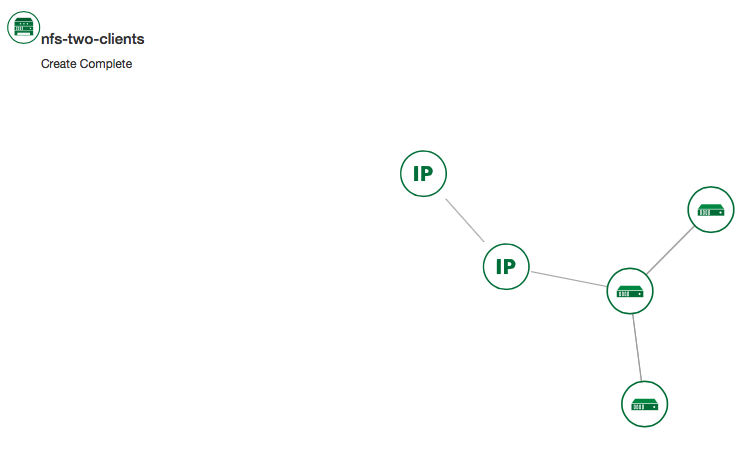
Now, launch a new stack with this template. Since the customized template is only on your computer and cannot be addressed by a URL, use the Direct Input method instead and copy/paste the content of the customized template. The resulting topology view is shown below: as you can see, the two client instances are shown separately since each one is defined as a separate resource in the template.
You may have realized already that while adding just one additional client instance was easy, launching more of them would require to copy / paste blocks of YAML many times while ensuring that the total count is correct. This would be easy to get wrong, especially when dealing with tens or hundreds of instances.
So instead, we leverage another construct from Heat: resource groups. Resource groups allow to define one kind of resource and request it to be created any number of times.
Remove the nfs_client and another_client resources from your customized template, and replace them with the following:
A resource group is configured with a properties field, containing the definition of the resource to launch (resource_def) and the number of resources to launch (count). Once launched, you will notice that the topology view groups all client instances under a single Resource Group icon. We use the same resource_def than when defining separate instances earlier.
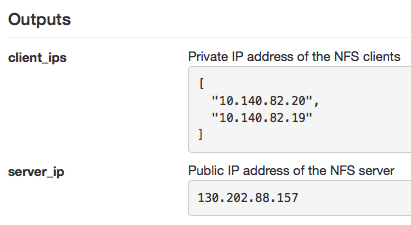
Another way we can customize this template is by adding outputs to the template. Outputs allow a Heat template to return data to the user. This can be useful to return values like IP addresses or credentials that the user must know to use the system.
We will create an output returning the floating IP address used by the NFS server. We define an outputs section, and one output with the name server_ip and a description. The value of the output is gathered using the get_attr function which obtains the IP address of the server instance.
You can get outputs in the Overview tab of the Stack Details page. If you want to use the command line, install python-heatclient and use the heatoutput-list and heatoutput-show commands, or get a full list in the information returned by heatstack-show.
Multiple outputs can be defined in the outputs section. Each of them needs to have a unique name. For example, we can add another output to list the private IPs assigned to client instances:
Finally, we can add a new parameter to replace the hard-coded number of client instances by a value passed to the template. Add the following text to the parameters section:
Inside the resource group definition, change count:2 to count:{get_param:nfs_client_count} to retrieve and use the parameter we just defined. When you launch this template, you will see that an additional parameter allows you to define the number of client instances, like in the NFS share appliance.
At this stage, we have fully recreated the NFS share appliance starting from the Hello World one! The next section will explain how to write a new template from scratch.
You may want to write a whole new template, rather than customizing an existing one. Each template should follow the same layout and be composed of the following sections:
Each Heat template has to include the heat_template_version key with a valid version of HOT (Heat Orchestration Template). Chameleon bare metal supports any HOT version up to 2015-10-15, which corresponds to OpenStack Liberty.
The Heat documentation lists all available versions and their features. We recommended that you always use the latest Chameleon supported version to have access to all supported features:
However, only a subset of them are supported by Chameleon, and some are limited to administrative use. We recommend that you only use:
OS::Glance::Image
OS::Heat::ResourceGroup
OS::Heat::SoftwareConfig
OS::Heat::SoftwareDeployment
OS::Heat::SoftwareDeploymentGroup
OS::Neutron::FloatingIP
OS::Neutron::FloatingIPAssociation
OS::Neutron::Port (advanced users only)
OS::Nova::Keypair
OS::Nova::Server
If you know of another resource that you would like to use and think it should be supported by the OpenStack services on Chameleon bare metal, let us know via our Help Desk.
Parameters allow users to customize the template with necessary or optional values.
For example, they can customize which Chameleon appliance they want to deploy, or which key pair to install.
Default values can be provided with the default key, as well as constraints to ensure that only valid OpenStack resources can be selected.
For example, custom_constraint:glance.image restricts the image selection to an available OpenStack image, while providing a pre-filled selection box in the GUI.
More details about constraints are available in the Heat documentation.
Outputs allow template to give information from the deployment to users. This can include usernames, passwords, IP addresses, hostnames, paths, etc. The outputs declaration is using the following format:
Generally values will be calls to get_attr, get_param, or some other function to get information from parameters or resources deployed by the
template and return them in the proper format to the user.
Chameleon’s reservation service allows users to reserve VLAN segments and floating ips. In order to make use of these
reserved resources in a (HOT) template, follow the guidelines below. For more information on VLAN and floating ip reservations,
see documentaiton on Creating a Lease to Reserve a VLAN Segment and Creating a Lease to Reserve Floating IPs
When you reserve a VLAN segment via blazar, it will automatically create a network for you. However, this network
is not usable in your template unless a subnet and router have been associated with the network. Once this is done, you can simply
add the network name as the network parameter for your server as you would sharednet1. The below cli commands
provides an example of how to complete the configuration for your reserved network.
For reserved floating ips, you need to associate the floating ip with a server using the OS::Neutron::FloatingIPAssociation object type.
Many of our older complex appliance templates use the OS::Nova::FloatingIPAssociation object, but this has since been deprecated. See example below
for proper usage:
If you are having trouble finding the uuid of the floating ip address then the below command will help you.
openstackfloatingiplist-cID-c"Floating IP Address"-cTags--long
The output should look like the sample output below with the uuid listed under the ID column. You can check your lease in
the reservation section of the GUI to find the reservation id associated with the floating ip in the Tags section of the output.