Images
All instances in Chameleon, whether KVM or bare metal, are running off disk images. The content of these disk images can be snapshotted at any point in time, which allows you to save your work and launch new instances from updated images later. While OpenStack KVM has built-in support for snapshotting in the Horizon web interface and via the command line, bare metal instances require a more complex process.
To work around this limitation, we provide the cc-snapshot utility that you can execute from inside your running instance. The cc-snapshot utility is pre-installed in all Chameleon supported appliances. You can find our appliances from the Appliance Catalog.
The image service on Chameleon uses OpenStack Glance. This documentation demonstrates how to accomplish common tasks with Images using the GUI and the CLI.
The cc-snapshot Utility
The cc-snapshot utility implements snapshotting a bare metal instance from command line and uploads it to Glance, so that it can be immediately used to boot a new bare metal instance. The snapshot images created with this tool are whole disk images.
For ease of use, cc-snapshot has been installed in all the appliances supported by the Chameleon project. If you would like to use it in a different setting, it can be downloaded and installed from the github repository.
To make a snapshot of a bare metal instance, run the following command from inside the instance:
sudo cc-snapshot <image_name>
Tip
You may get warnings, such as “image too large”, during snapshotting, and get prompted to confirm. If you are confident about what you are trying to do, you can skip all warnings by using the -f flag.
sudo cc-snapshot -f <image_name>
In addition, you can exclude directories by using the -e flag.
sudo cc-snapshot -e <dir1> -e <dir2> <image_name>
To see all available options for cc-snapshot, run sudo cc-snapshot -h.
You will be prompted to enter your username and password.
Tip
You can skip entering username and password by setting the OS_USERNAME and OS_PASSWORD environment variables. You can set those environment variables manually or using The OpenStack RC Script.
Note
When using the cc-snapshot, it will create an image within your project with the shared visibility. Anyone with access to your project can access this image.
Note
If you choose an Image name that already exists, the previous one will not be overwritten. A new Image with the same name but a different UUID will be generated.
Note
If you install a custom kernel, please make sure the size of your running kernel (/lib/modules/<kernel_version>) is less than 4GB. To find out which kernel version you’re running, run uname -r.
Error
If you receive the following error:
public endpoint for image service in regionOne not found Unable to contact Glance, check username and password
it means that you have an outdated copy of cc-snapshot and you will need to update cc-snapshot.
This usually happens when you use an older images that contains an outdated version of cc-snapshot.
You may also want to get new functionalities added to the latest version of cc-snapshot.
Run the following commands from your instance:
curl -O https://raw.githubusercontent.com/ChameleonCloud/cc-snapshot/master/cc-snapshot
sudo mv cc-snapshot /usr/bin/
sudo chmod +x /usr/bin/cc-snapshot
Managing Images using the GUI
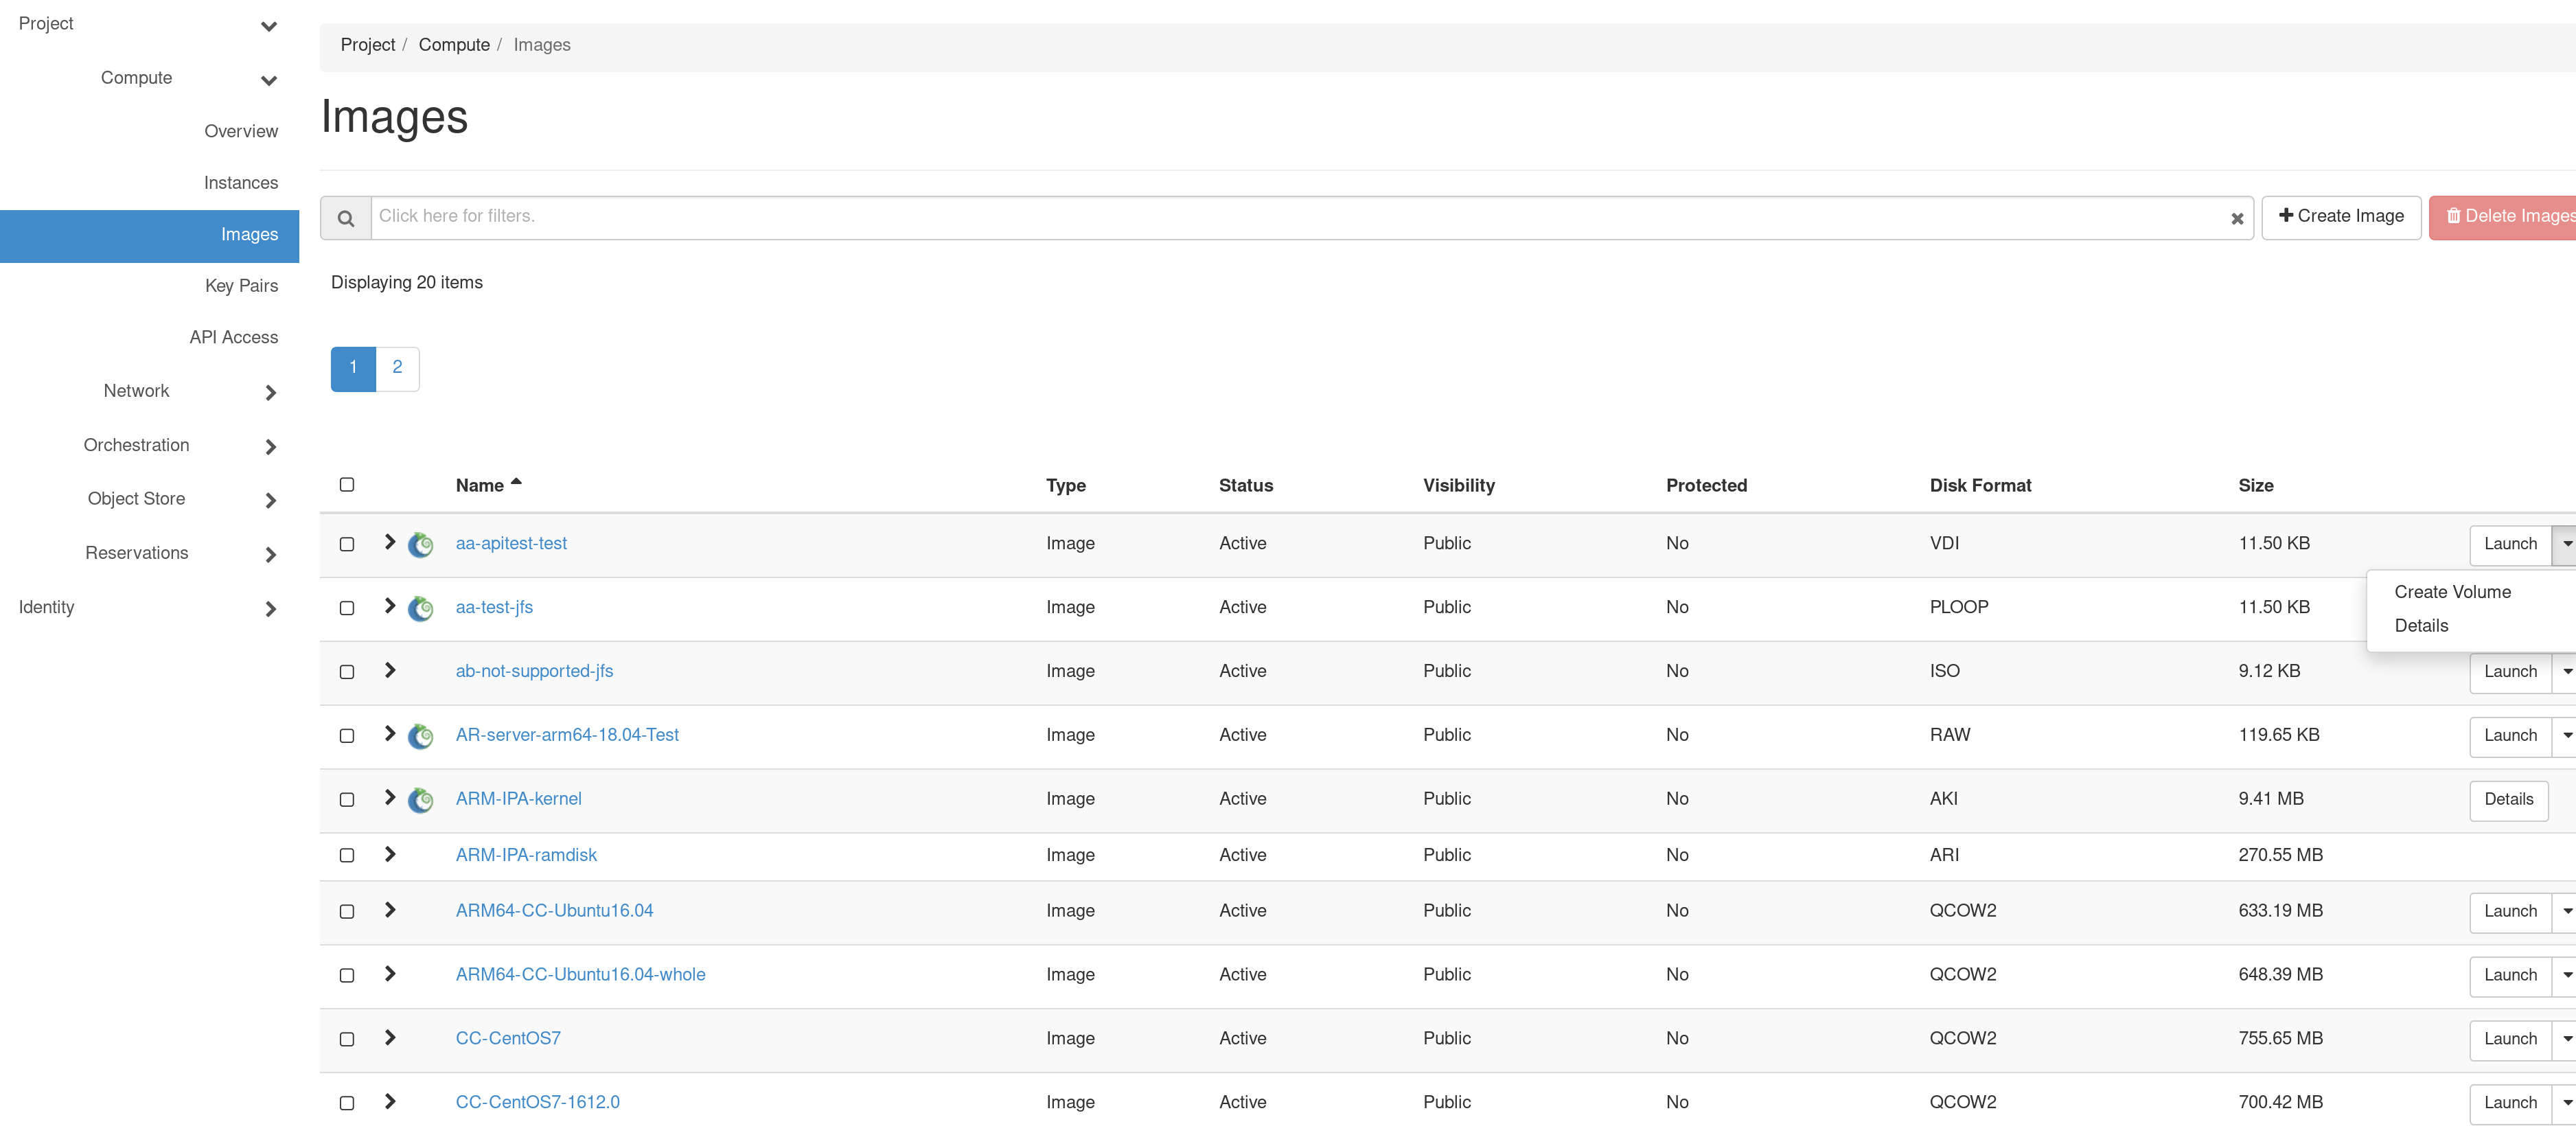
To manage your images, use the Images page at CHI@TACC or CHI@UC, by clicking on Project > Compute > Images.

The Images page
Note
The Chameleon logo next to an image’s name indicates that this image is an appliance supported by the Chameleon project, and is part of the Appliance Catalog.
Tip
Select Details from the dropdown menu to the right of any Chameleon supported appliance to view the relevant entry from the Chameleon Appliance Catalog.
Note
Images at each site are stored independently. An Image made at CHI@TACC will not be available at CHI@UC (or vice versa) unless transferred manually.
Uploading an Image
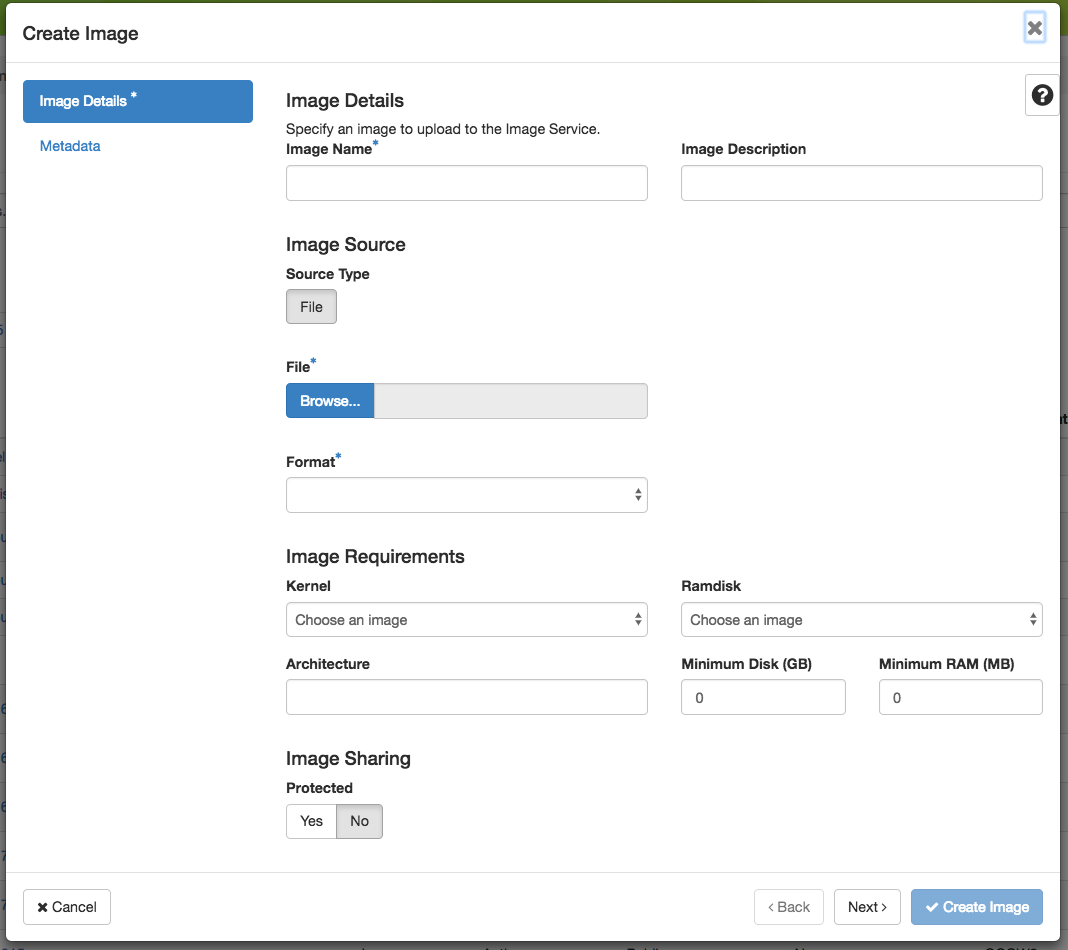
Use + Create Image button to upload an image.

The Create Image dialog
In the Create Image dialog:
Enter an Image Name and, optionally, a description.
Click Browse to select a file on your local machine to upload.
Select a Format of the image. Images created by the
cc-snapshotutility are QCOW2 images.To add additional metadata for your image, use the Metadata section by clicking Metadata in the sidebar.
Click the Create Image button to upload your image.
Launching Instance using an Image
During the process of launching instance from the Instance page, it will ask you to select an image. Alternatively, you can launch instances with a selected image from the Image page by simply clicking on the Launch button located in the same row of the targeted image.
Tip
Other than Launch, there are other actions you may perfom on the image. Clicking on the dropdown to explore more on what you can do.
Viewing Image Details
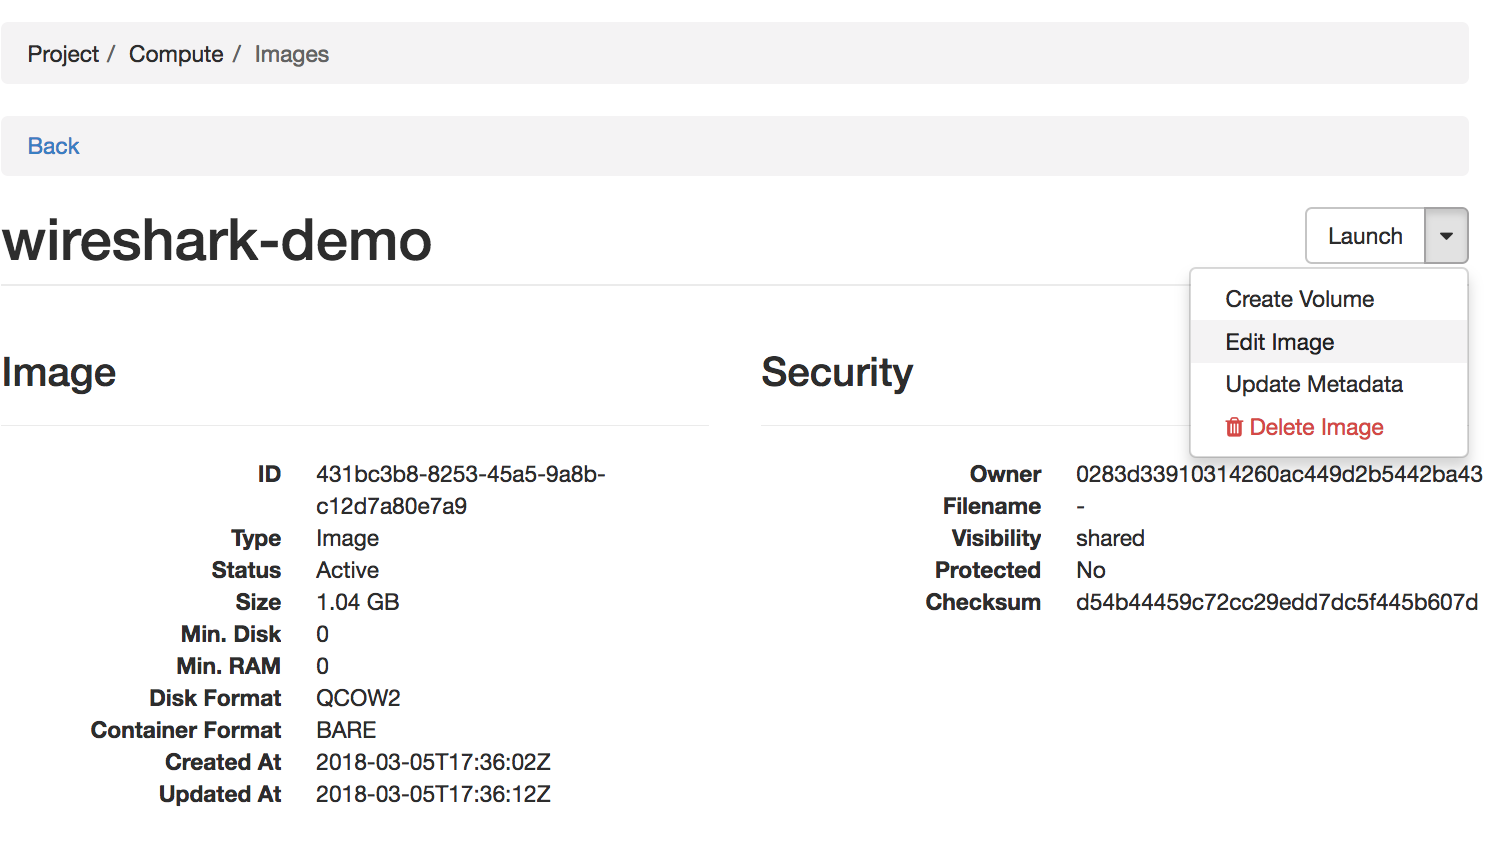
To view image details, click on the name of the Image.

Image details
The dropdown list in the top right corner allows you to perform various actions on the selected image, such as Launch, Edit Image, and Update Metadata.
Tip
The ID on the image details’ page is useful when you work on the image using the CLI.
Publishing Images to the Appliance Catalog

The dropdown menu to the right of listed images allows their owners to publish an appliance to the Appliance Catalog. Select Publish to Appliance Catalog.
The Create Appliances web form will open automatically with most fields pre-populated. Complete the form and select Create an Appliance.
Entering a descriptive name, author and support contact information, the version, and an informative description can be helpful and is encouraged. The description is used by others to determine if an appliance contains the tools needed for their research.
Tip
To make your description effective you may want to ask the following questions:
What does the appliance contain?
What are the specific packages and their versions?
What is it useful for?
Where can it be deployed and/or what restrictions/limitations does it have?
How should users connect to it and what accounts are enabled?
Managing Images using the CLI
Tip
Reading Command Line Interface (CLI) is highly recommanded before continuing on the following sections.
Uploading an Image
After configuring the environment variables using The OpenStack RC Script, run the following command:
openstack image create --file <file> --disk-format <format> <image-name>
Provide the path to and the name of your image file in your local file system as the value of the file parameter. Also, indicate the image format using the format switch, such as QCOW2. Finally, name your image via the image-name switch.
Downloading an Image
Downloading an image file to your local machine is only available via the CLI. You may find it useful when transferring images from one Chameleon site to another. To download an image file, run the following command:
openstack image save --file <filename> <image>
Use filename to indicate where you would like to save the image in your local file system. Also, replace image with either the name or the ID of the image on Chameleon.
Important
If you do not provide the --file parameter, it will print out the binary image data in your terminal.
Retrieving Images
You may list all images of your project by typing:
openstack image list
Optionally, you may add filters to the list, such as --shared to only display the images shared within your project. Use openstack image list --help to see all the available filters.
Viewing Image Details
You may view details of an image with the command:
openstack image show <image>
Replace image with either an image name or it’s UUID.
Editing an Image
You may edit an image using the command:
openstack image set <image> ...
Replace image with either an image name or it’s UUID. You must provide additional flags to update an image. Use openstack image set --help to see all the options.