Provisioning and managing resources using the CLI
The sections above present the most user friendly mode of usage, with most actions performed via the GUI. However, Chameleon can be accessed via the OpenStack command line tools which provides more capabilities. This section presents some advanced usage using the command line tools.
Tip
Reading Command Line Interface (CLI) is highly recommended before continuing on the following sections.
Blazar client installation
To reserve specific nodes, based on their identifier or their resource
specifications, you must use the Blazar command line client. To use the
CLI, you must install the python-blazarclient. To install
python-blazarclient, run the following command:
pip install git+https://github.com/ChameleonCloud/python-blazarclient.git@chameleoncloud/xena
Note
To reserve VLAN segments or floating IPs, you must use a Chameleon fork of the Blazar client, as above.
Before using Blazar Client, You must configure the environment variables for
your project via source the OpenStack RC Script or
use the CLI switches every time you run the commands. Type blazar in your
terminal session to enter the Interactive Mode. You may also use blazar in
the Shell Mode.
Warning
Two common causes of an Internal Server Error when creating a lease:
Your application credential does not have the Unrestricted checkbox enabled — see Creating an application credential. Blazar requires this to create reservations.
Using
==instead of=as the comparison operator insideresource_properties. The query language used byresource_propertiestakes a single=for equality, as in the examples below —==is not valid and will cause the request to fail.
Creating a lease to reserve physical hosts
To create a lease, use the lease-create command. The following arguments are
required:
--reservationwith themin,max,resource_type, andresource_propertiesattributes--start-datein"YYYY-MM-DD HH:MM"format--end-datein"YYYY-MM-DD HH:MM"formatA lease name
If --start-date is ommitted, then the current date and time will be used by default.
For example, the following command will create a lease with the name of
my-first-lease and the node type of compute_skylake that starts on June
17th, 2022 at 4:00pm and ends on June 17th, 2022 at 6:00pm:
openstack reservation lease create \
  --reservation min=1,max=1,resource_type=physical:host,resource_properties='["=", "$node_type", "compute_skylake"]' \
  --start-date "2022-06-17 16:00" \
  --end-date "2022-06-17 18:00" \
  my-first-lease
Instead of specifying the node type, you may also reserve a specific node by
providing it’s UUID. For example, to reserve the node with UUID of
c9f98cc9-25e9-424e-8a89-002989054ec2, you may run the command similar to the
following:
openstack reservation lease create \
  --reservation min=1,max=1,resource_type=physical:host,resource_properties='["=", "$uid", "c9f98cc9-25e9-424e-8a89-002989054ec2"]' \
  --start-date "2022-06-17 16:00" \
  --end-date "2022-06-17 18:00" \
  my-custom-lease
To create a lease with multiple resource properties, you must combine them like
["and", [property1], [property2], [...] ]. For example, to reserve a node
with $architecture.smt_size of 48 and node_type of compute_haswell:
openstack reservation lease create \
  --reservation min=1,max=1,resource_type=physical:host,resource_properties='["and", ["=", "$architecture.smt_size", "48"], ["=", "$node_type", "compute_haswell"]]' \
  --start-date "2022-06-17 16:00" \
  --end-date "2022-06-17 18:00" \
  my-custom-lease
Attention
To specify a before_end action, simply add before_end=<action_type>
to reservation parameter. For example:
openstack reservation lease create \
  --reservation min=1,max=1,resource_type=physical:host,resource_properties='["=", "$uid", "c9f98cc9-25e9-424e-8a89-002989054ec2"]',before_end=email \
  --start-date "2022-06-17 16:00" \
  --end-date "2022-06-17 18:00" \
  my-custom-lease
Currently supported before_end action types include
Action Type |
Description |
|
Send an email notification. |
|
Default action used when no action is specified;
Currently set to |
|
Do nothing. |
The default before_end action is set to email. To disable the email
notification, set before_end=''.
Actually, you may use any resource property that is in the resource registry to reserve the nodes. To see the list of properties of nodes, first get the full list of nodes with the command:
openstack reservation host list
The output should look like:
+------+--------------------------------------+-------+-----------+----------+
| id   | hypervisor_hostname                  | vcpus | memory_mb | local_gb |
+------+--------------------------------------+-------+-----------+----------+
| 151  | 00401ba8-4fb0-4f1e-a7dc-e93065ebdd15 |    24 |    128000 |      200 |
| 233  | 004c89fa-ff13-4563-9012-f2d62c1a7aff |    24 |    128000 |      200 |
| 330  | 01029fb8-0a0b-4949-92b0-a756fb8588e5 |    24 |    128000 |      200 |
| 146  | 036b16e3-9fa6-442c-8e6d-cfe12ed5c8a3 |    24 |    128000 |      200 |
| 992  | 05dd5e25-440f-4492-b3b8-9d39af83b8bc |     8 |      3200 |      100 |
| 219  | 066d92f5-7cb9-49ea-8f05-842566672ebf |    24 |    128000 |      200 |
| 3216 | 06b164d5-3514-4ebe-8928-0bd2f9508b80 |     0 |         0 |        0 |
| 156  | 07030786-d6e8-46b4-b0f2-79b0b303b518 |    24 |    128000 |      200 |
| 212  | 07051549-c404-44af-8e73-8beb5891864a |    24 |    128000 |      200 |
| 175  | 07fd65f0-b814-429b-a2fb-3a4afa52de41 |    24 |    128000 |      200 |
| 255  | 081d2cb1-b6b5-4014-b226-7a42d8588307 |    24 |    128000 |      200 |
To get resource properties of a host, run host-show command with the id
listed in the first column. For example, to get the resource properties of the
host 151, run:
openstack reservation host show 151
The output should look like:
+----------------------------------+---------------------------------------------+
| Field                            | Value                                       |
+----------------------------------+---------------------------------------------+
| architecture.platform_type       | x86_64                                      |
| architecture.smp_size            | 2                                           |
| architecture.smt_size            | 48                                          |
| bios.release_date                | 03/09/2022                                  |
| bios.vendor                      | Dell Inc.                                   |
| bios.version                     | 1.2                                         |
| chassis.manufacturer             | Dell Inc.                                   |
| chassis.name                     | PowerEdge R630                              |
| chassis.serial                   | 4VJGD42                                     |
| cpu_info                         | baremetal cpu                               |
| created_at                       | 2022-06-26 20:50:58                         |
| gpu.gpu                          | False                                       |
| hypervisor_hostname              | 00401ba8-4fb0-4f1e-a7dc-e93065ebdd15        |
| hypervisor_type                  | ironic                                      |
| hypervisor_version               | 1                                           |
| id                               | 151                                         |
| uid                              | c9f98cc9-25e9-424e-8a89-002989054ec2        |
| updated_at                       |                                             |
| vcpus                            | 48                                          |
| version                          | 78dbf26565cf24050718674dcf322331fab8ead5    |
+----------------------------------+---------------------------------------------+
Any of the property listed in the field column may be used to reserve the nodes.
For example, you can use resource_properties='["=", "$architecture.smp_size",
"2"]' to reserve a node with two physical processors.
Note
Remember to use $ in front of the property.
Extending a lease
To extend your lease, use lease-update command, and provide time duration
via --prolong-for switch. The format of the duration is a number followed by
a letter specifying the time unit. w is for weeks, d is for days and
h is for hours. For example, if you would like to extend the
my-first-lease by one day, run the following command:
openstack reservation lease update --prolong-for "1d" my-first-lease
Chameleon node types
The following node types are reservable on Chameleon.
Node Type |
|
Skylake compute nodes |
|
Storage nodes |
|
Haswell Infiniband nodes |
|
Storage Hierarchy nodes |
|
NVIDIA K80 nodes |
|
NVIDIA M40 nodes |
|
NVIDIA P100 nodes |
|
NVIDIA P100 NVLink nodes |
|
NVIDIA RTX 6000 nodes |
|
FPGA nodes |
|
Low power Xeon nodes |
|
Atom nodes |
|
ARM64 nodes |
|
Creating a lease to reserve a VLAN segment
To create a lease, use the lease-create command. The following arguments are
required:
--reservationwith theresource_typeandnetwork_nameattributes--start-datein"YYYY-MM-DD HH:MM"format--end-datein"YYYY-MM-DD HH:MM"formatA lease name
Optional attributes include network_description and resource_properties
which can both be added to the --reservation argument.
For example, the following command will create a lease with the name of
my-first-vlan-lease and the network name my-network that starts on June
17th, 2022 at 4:00pm and ends on June 17th, 2022 at 6:00pm:
openstack reservation lease create --reservation resource_type=network,network_name="my-network" --start-date "2022-06-17 16:00" --end-date "2022-06-17 18:00" my-first-vlan-lease
Adding the network_description attribute provides its value as the
description field when creating the Neutron network for advanced networking configurations.
openstack reservation lease create --reservation resource_type=network,network_name="my-network",network_description="OFController=${OF_CONTROLLER_IP}:${OF_CONTROLLER_PORT}" --start-date "2022-06-17 16:00" --end-date "2022-06-17 18:00" my-first-vlan-lease
Adding the resource_properties attribute allows you to reserve a specific
network segment or physical network type. There are currently only two
physical network types physnet1 and exogeni. You can read more about
both types in Networking. The following two examples show how to reserve
a network by segment_id or physical_network.
openstack reservation lease create --reservation resource_type=network,network_name=my-network,resource_properties='["=","$segment_id","3501"]' --start-date "2022-06-17 16:00" --end-date "2022-06-17 18:00" my-first-vlan-lease
openstack reservation lease create --reservation resource_type=network,network_name=my-network,resource_properties='["=","$physical_network","physnet1"]' --start-date "2022-06-17 16:00" --end-date "2022-06-17 18:00" my-first-vlan-lease
While separate leases can be created to reserve nodes and VLAN segments, it is also possible to combine multiple reservations within a single lease. The following example creates a lease reserving one Skylake compute node and one VLAN segment:
openstack reservation lease create --reservation min=1,max=1,resource_type=physical:host,resource_properties='["=", "$node_type", "compute_skylake"]' --reservation resource_type=network,network_name="my-network" --start-date "2022-06-17 16:00" --end-date "2022-06-17 18:00" my-combined-lease
Once your lease is active, the network named above already exists — you still need to configure a subnet and router on it before instances can use it. See Isolated network VLANs for those steps.
Creating a lease to reserve floating IPs
To create a lease, use the lease-create command. The following arguments are required:
--reservationwith theresource_typeandnetwork_idattributes--start-datein"YYYY-MM-DD HH:MM"format--end-datein"YYYY-MM-DD HH:MM"formatA lease name
Multiple floating IPs can be reserved using the amount attribute. If
ommitted, only one floating IP is reserved.
For example, the following command will create a lease with the name of
my-first-fip-lease that starts on June 17th, 2022 at 4:00pm and ends on
June 17th, 2022 at 6:00pm and reserves three floating IPs:
pip install python-openstackclient
PUBLIC_NETWORK_ID=$(openstack network show public -c id -f value)
openstack reservation lease create --reservation resource_type=virtual:floatingip,network_id=${PUBLIC_NETWORK_ID},amount=3 --start-date "2022-06-17 16:00" --end-date "2022-06-17 18:00" my-first-fip-lease
Once your floating IP lease is active, you can attach one of the reserved IPs to a running instance:
openstack server add floating ip <server> <floating-ip-address>
Use openstack floating ip list to see the floating IPs reserved by your
lease, and openstack server remove floating ip <server> <floating-ip-address>
to detach one later.
Reallocating a node in your lease
After creating your lease, you can view its details in the Horizon web interface. On this page, at the bottom, you can see a list of nodes in your lease. If you wish to reallocate one of the nodes in your lease, you can press the red “Re-Allocate Host” button next to it.
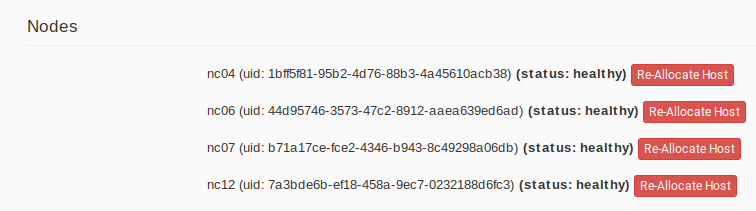
The nodes on the lease detail page.
You can also do the same on the command-line. Run the command that follows, entering your lease ID and the node ID where appropriate.
openstack reservation host reallocate --lease-id LEASE_ID NODE_ID
If you re-allocate a host because it is malfunctioning, please make sure to report it to the Help Desk so that we can fix it.
Creating a lease for a flavor (on KVM@TACC)
Since KVM@TACC is virtualized, instead of creating a lease for a physical host, you create a lease for a VM flavor. First, this requires finding what flavor you wish to create an instance of. You can find the list of available flavors by running the command:
openstack flavor list
which should return something like:
+--------------------------------------+---------------+--------+------+-----------+-------+-----------+
| ID                                   | Name          |    RAM | Disk | Ephemeral | VCPUs | Is Public |
+--------------------------------------+---------------+--------+------+-----------+-------+-----------+
| 1                                    | m1.tiny       |    512 |    1 |         0 |     1 | True      |
| 2                                    | m1.small      |   2048 |   20 |         0 |     1 | True      |
| 3                                    | m1.medium     |   4096 |   40 |         0 |     2 | True      |
| 4                                    | m1.large      |   8192 |   40 |         0 |     4 | True      |
| 5                                    | m1.xlarge     |  16384 |   40 |         0 |     8 | True      |
| 6                                    | m1.xxlarge    |  32768 |   40 |         0 |    16 | True      |
| e81f12f8-de06-4107-acfd-e649217036ef | g1.h100.pci.1 | 250000 |   40 |         0 |    48 | True      |
+--------------------------------------+---------------+--------+------+-----------+-------+-----------+
Note the ID of the flavor you wish to create a lease for. Then to create a lease,
use the lease-create command. The following arguments are
required:
--reservationwithresource_type=flavor:instance,flavor_idandamountattributes--start-datein"YYYY-MM-DD HH:MM"format--end-datein"YYYY-MM-DD HH:MM"format
For example, the following command will create a lease with the name of
my-first-lease for 2 m1.large instances that starts on June
17th, 2022 at 4:00pm and ends on June 17th, 2022 at 6:00pm:
openstack reservation lease create \
  --reservation "resource_type=flavor:instance,flavor_id=4,amount=2" \
  --start-date "2022-06-17 16:00" \
  --end-date "2022-06-17 18:00" \
  my-first-lease
Note
KVM@TACC lease durations follow a different policy than bare metal — see the Chameleon FAQ for details.
Once the lease is active, a new flavor named reservation:<reservation-id>
becomes available — this is the flavor tied to your reservation. Launch your
instance against it instead of the original flavor:
openstack server create \
  --flavor reservation:<reservation-id> \
  --image <image> \
  --network sharednet1 \
  my-kvm-instance
The <reservation-id> is the id of the individual reservation inside
your lease (not the lease ID itself), which you can find with:
openstack reservation lease show <lease-name>
See Work with KVM using the CLI for other KVM@TACC CLI operations, such as managing security groups and creating instance snapshots.